> ## Documentation Index
> Fetch the complete documentation index at: https://docs.rocket.new/llms.txt
> Use this file to discover all available pages before exploring further.
# Visual edit
> Click any element in your Rocket.new app preview to change text, style, spacing, or images without writing code.
export const LlmsDirective = () =>
For the complete documentation index, see llms.txt.
For a lightweight markdown version of this page, append .md to the URL.
;
Visual edit is accessed via the **web browser**, but you can use it to edit both web app and mobile app build tasks.
Visual edit lets you click directly on any element in your preview and change it on the spot. No prompts, no guessing selectors. Select something, adjust it, and save.
## When to use visual edit
| Use visual edit when | Use chat instead when |
| :----------------------------------- | :------------------------------------------- |
| You can see and click the element | You need changes across multiple pages |
| Quick text, style, or spacing tweaks | Complex layout restructuring or new sections |
| You want immediate visual feedback | You are adding new features or logic |
## How to use
In the preview toolbar, click **Edit**. A dropdown appears with two options: **Visual edits** and **Theme**.
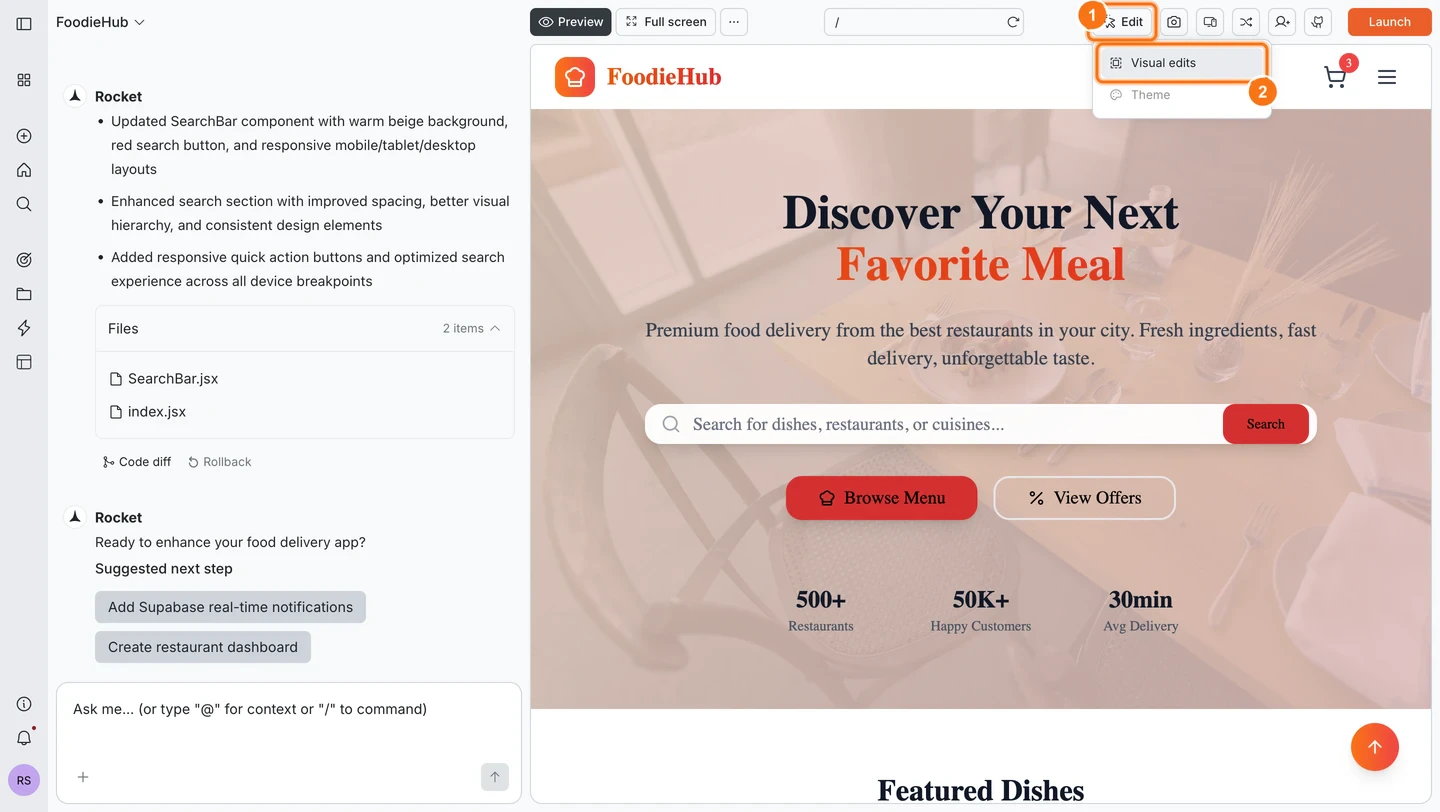
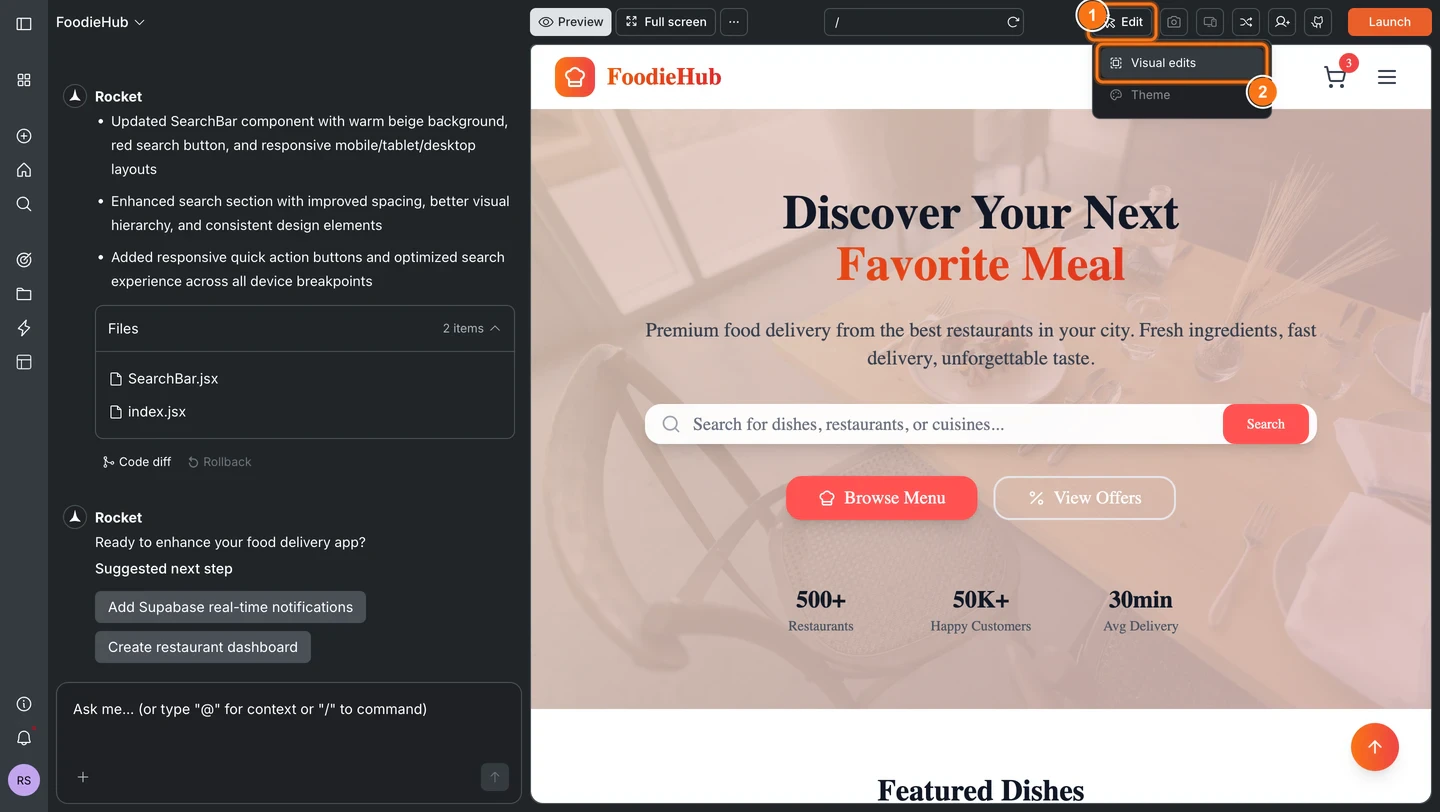 Click **Visual edits**. The preview becomes interactive and elements highlight as you hover over them.
Click any element to select it. A floating toolbar appears with editing controls and an **Ask me...** field for quick AI-assisted changes.
Click **Visual edits**. The preview becomes interactive and elements highlight as you hover over them.
Click any element to select it. A floating toolbar appears with editing controls and an **Ask me...** field for quick AI-assisted changes.
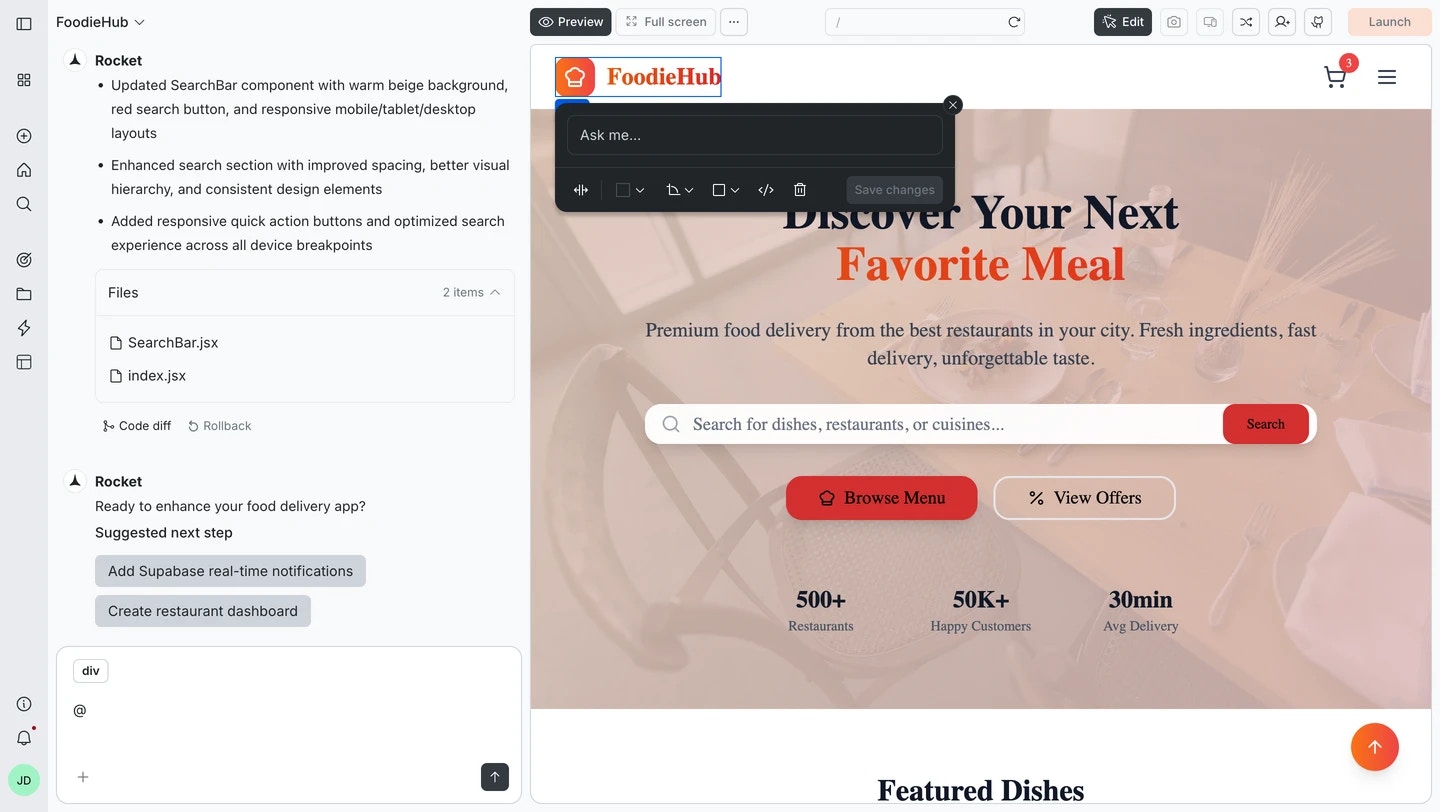 Use the toolbar controls to adjust style, spacing, text, or images. You can also type a change in the **Ask me...** field and Rocket applies it to just that element.
Click **Save changes** to write all pending changes to code. You can edit multiple elements before saving and they all apply at once.
## Editing tools
### Edit style
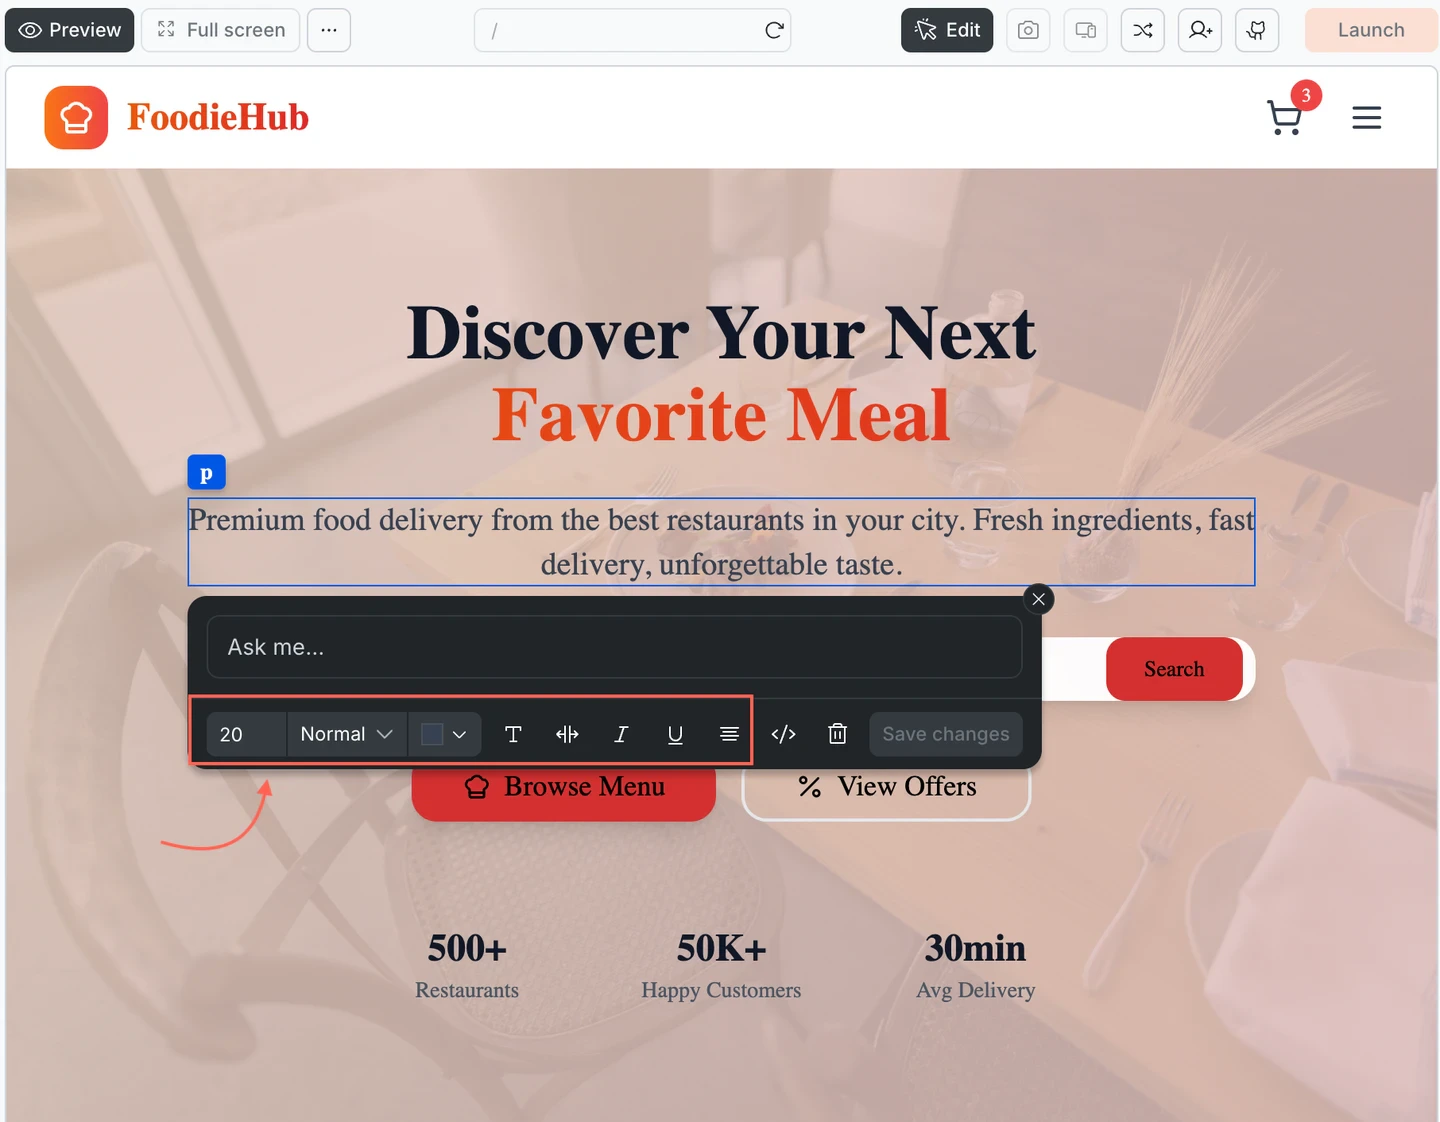
Adjust colors, fonts, weight, and alignment directly in the toolbar.
Click the element you want to style.
Use the font size, weight, color, or alignment controls in the toolbar. Changes apply immediately in the preview.
Click **Save changes**.
Use the toolbar controls to adjust style, spacing, text, or images. You can also type a change in the **Ask me...** field and Rocket applies it to just that element.
Click **Save changes** to write all pending changes to code. You can edit multiple elements before saving and they all apply at once.
## Editing tools
### Edit style
Adjust colors, fonts, weight, and alignment directly in the toolbar.
Click the element you want to style.
Use the font size, weight, color, or alignment controls in the toolbar. Changes apply immediately in the preview.
Click **Save changes**.
 ### Edit spacing
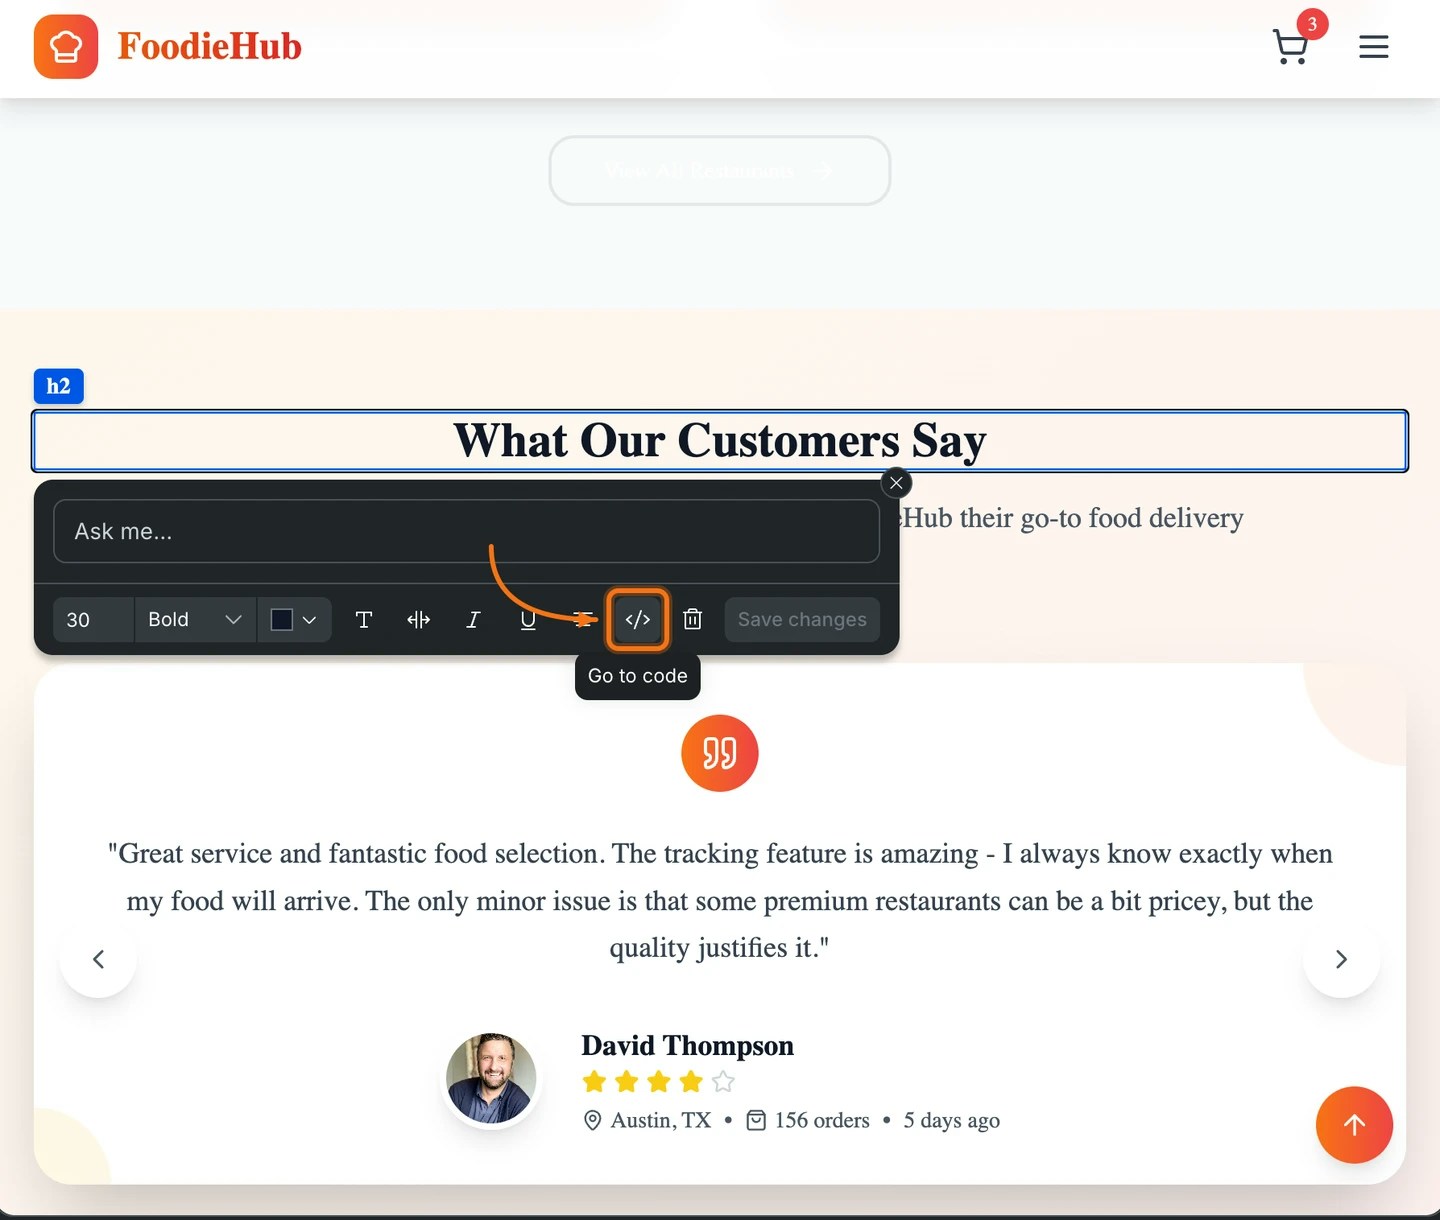
Adjust margin and padding values on any element.
Click the element you want to adjust.
Click the spacing icon in the toolbar.
Enter values for each side of the margin and padding.
Click **Save changes**.
### Edit spacing
Adjust margin and padding values on any element.
Click the element you want to adjust.
Click the spacing icon in the toolbar.
Enter values for each side of the margin and padding.
Click **Save changes**.
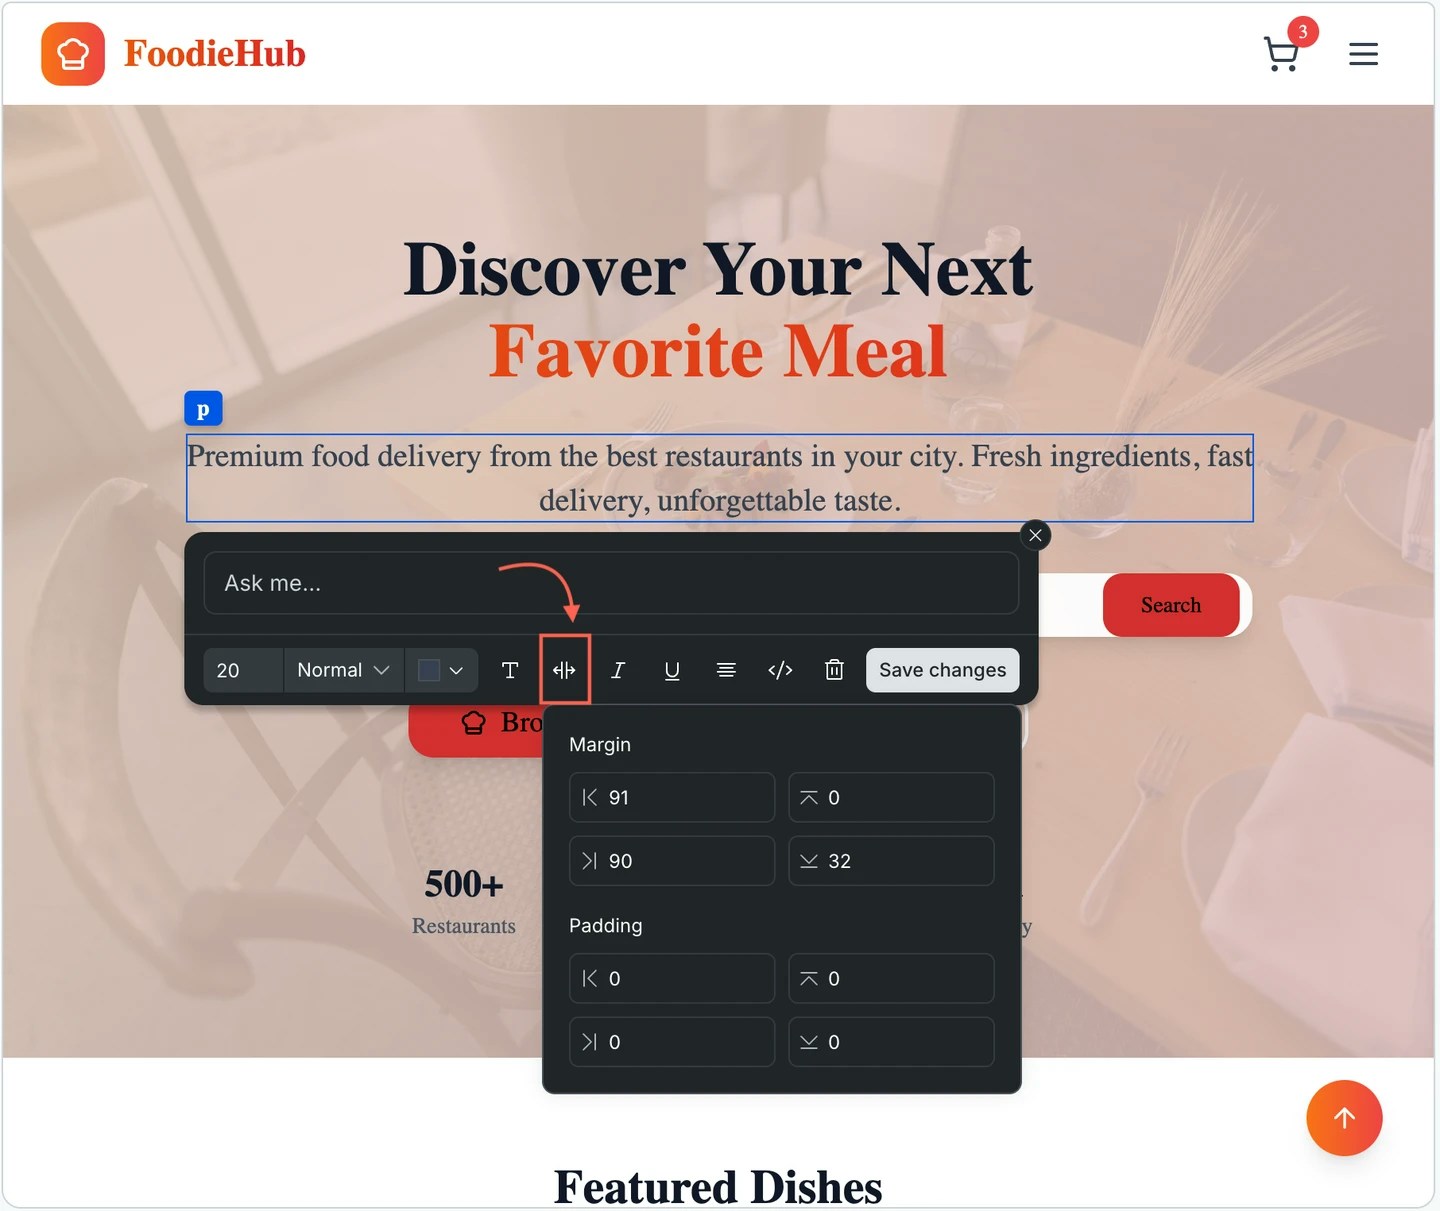 ### Edit image
Replace or update an image without touching code.
Click an image element to select it.
Click the image icon in the toolbar.
Choose how to update it:
* **Import** a URL from the web
* **Upload** a file from your device (PNG, JPG up to 1MB)
* **Auto** to regenerate the image with AI
* **Instruction** to describe what you want
Click **Update**.
### Edit image
Replace or update an image without touching code.
Click an image element to select it.
Click the image icon in the toolbar.
Choose how to update it:
* **Import** a URL from the web
* **Upload** a file from your device (PNG, JPG up to 1MB)
* **Auto** to regenerate the image with AI
* **Instruction** to describe what you want
Click **Update**.
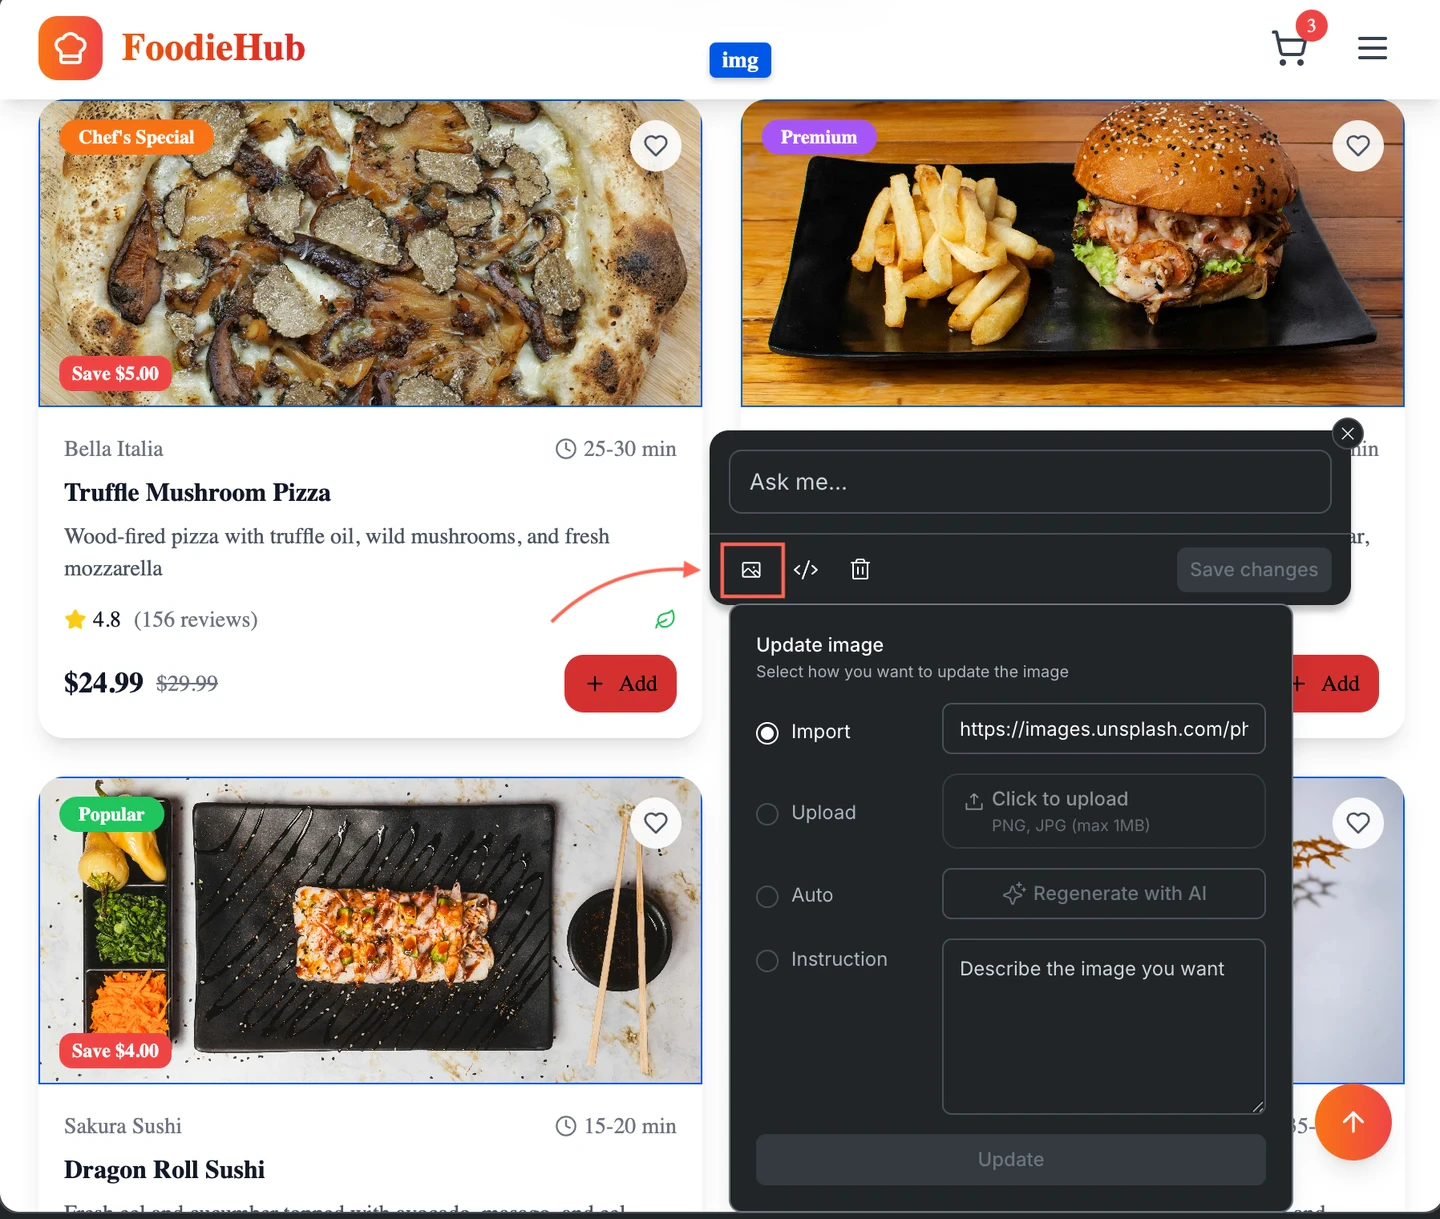 ### Delete an element
Remove an element from the page.
Click the element you want to remove.
Click the **Delete element** icon at the end of the toolbar.
Click **Save changes**.
### Delete an element
Remove an element from the page.
Click the element you want to remove.
Click the **Delete element** icon at the end of the toolbar.
Click **Save changes**.
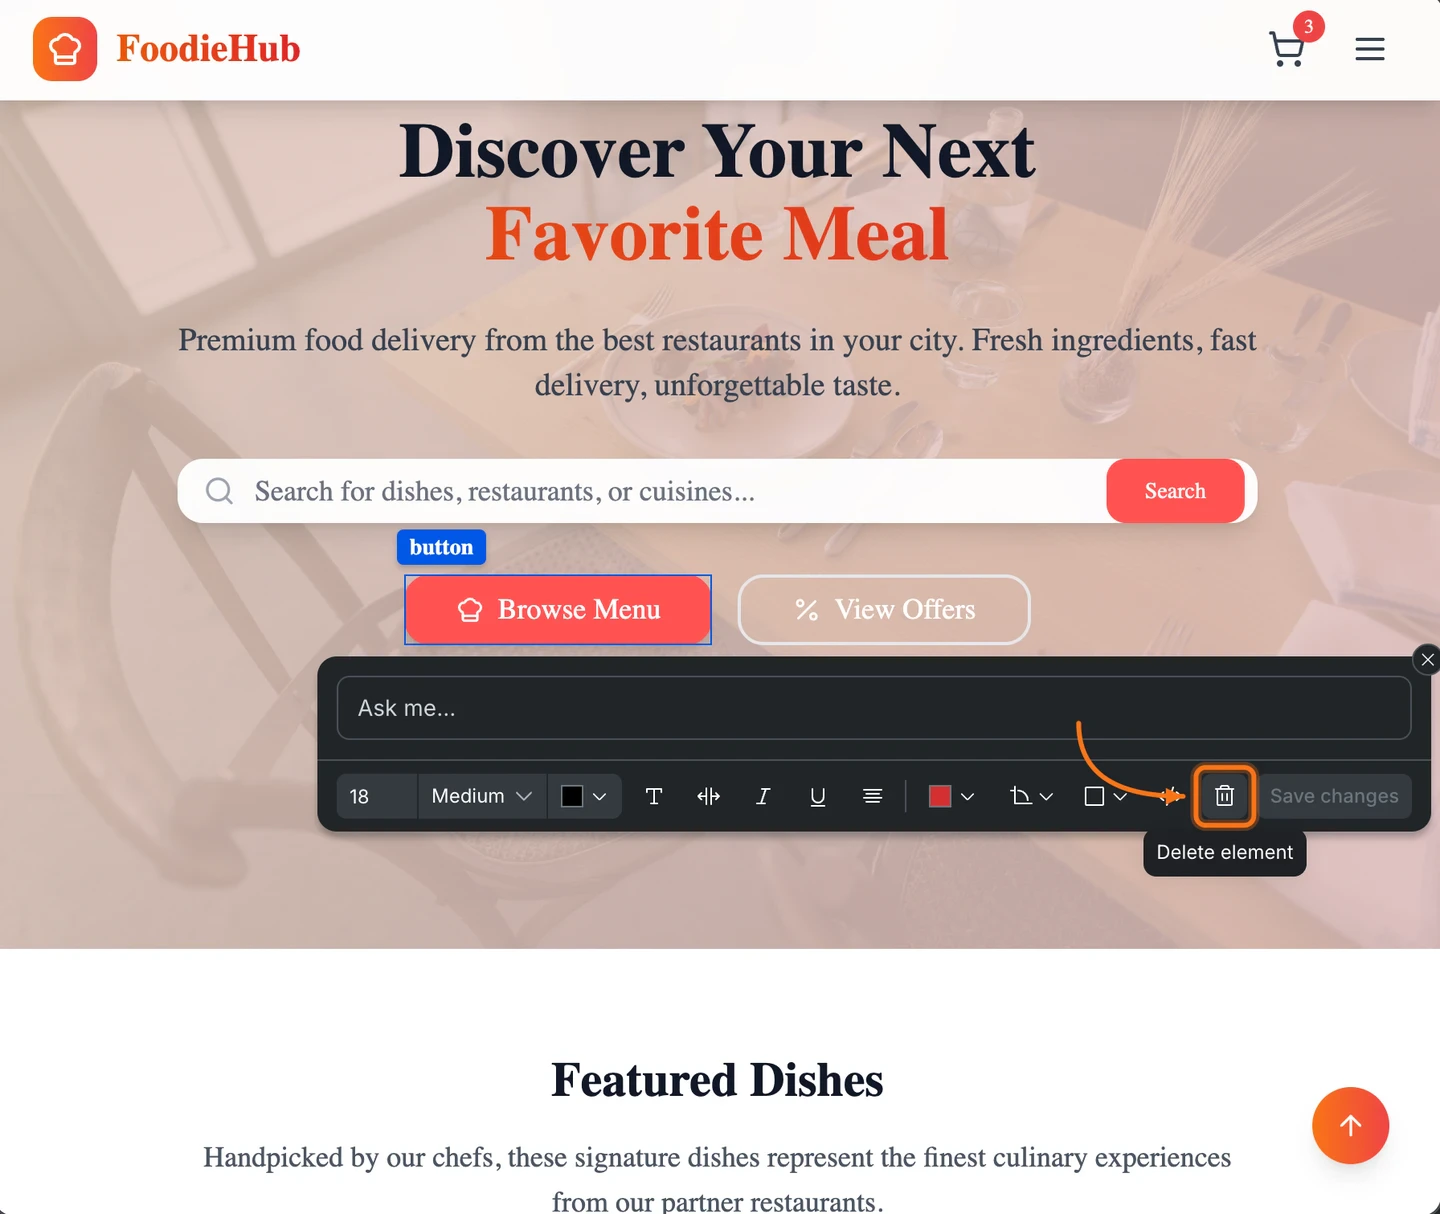 ### Go to code
Jump directly to the element's source code for changes beyond what the toolbar offers.
Click the element whose code you want to view.
Click the **``** icon in the toolbar. The code view opens with the element highlighted.
### Go to code
Jump directly to the element's source code for changes beyond what the toolbar offers.
Click the element whose code you want to view.
Click the **``** icon in the toolbar. The code view opens with the element highlighted.
 ### Ask for a quick change
Every selected element has an **Ask me...** field at the top of the toolbar. Type a change in plain language and Rocket applies it to just that element.
**Examples:**
* `Make this button orange with white text and rounded corners`
* `Set this heading to bold, center aligned, 32px`
* `Add 24px padding and a subtle box shadow to this card`
* `Change the background to a gradient from blue to purple`
## Toolbar reference
| Tool | What it does |
| :--------------- | :---------------------------------------------------- |
| Ask me... | Apply a plain-language change to the selected element |
| Font size | Set the size numerically |
| Font weight | Toggle Bold, Semibold, Normal, etc. |
| Color | Change the text or fill color |
| T | Edit the text content inline |
| Spacing | Adjust margin and padding |
| I / U | Italic and underline |
| Align | Change text or element alignment |
| Image | Replace or regenerate an image |
| `` | Jump to the element's source code |
| Delete | Remove the element from the page |
| **Save changes** | Write all pending changes to code |
## What's next?
Update your site's fonts, colors, logo, and images from one place.
Use slash and @ commands for precise, targeted edits.
Use chat for bigger changes, new sections, or logic updates.
Browse and edit your task source files directly.
### Ask for a quick change
Every selected element has an **Ask me...** field at the top of the toolbar. Type a change in plain language and Rocket applies it to just that element.
**Examples:**
* `Make this button orange with white text and rounded corners`
* `Set this heading to bold, center aligned, 32px`
* `Add 24px padding and a subtle box shadow to this card`
* `Change the background to a gradient from blue to purple`
## Toolbar reference
| Tool | What it does |
| :--------------- | :---------------------------------------------------- |
| Ask me... | Apply a plain-language change to the selected element |
| Font size | Set the size numerically |
| Font weight | Toggle Bold, Semibold, Normal, etc. |
| Color | Change the text or fill color |
| T | Edit the text content inline |
| Spacing | Adjust margin and padding |
| I / U | Italic and underline |
| Align | Change text or element alignment |
| Image | Replace or regenerate an image |
| `` | Jump to the element's source code |
| Delete | Remove the element from the page |
| **Save changes** | Write all pending changes to code |
## What's next?
Update your site's fonts, colors, logo, and images from one place.
Use slash and @ commands for precise, targeted edits.
Use chat for bigger changes, new sections, or logic updates.
Browse and edit your task source files directly.