What you can do in chat
- Add new pages, features, or components
- Change layouts, colors, typography, and spacing
- Fix bugs and errors
- Connect integrations like Supabase, Stripe, or Resend
- Ask Rocket to explain or refactor existing code

- “Add a pricing page with three tiers: Free, Pro, and Business”
- “Make the hero section taller with a gradient background from blue to purple”
- “Connect the contact form to send emails using Resend”
- “Fix the signup form - the submit button is not responding”
- “Add dark mode support across the whole app”
For faster, targeted edits on the web, use slash and @ commands directly from the chat input.
Attachments
Attach a file to give Rocket a visual reference or content to work with.Open the attachment picker
Click the + button at the lower left of the chat input and select Add files & photos. You can also drag and drop or paste an image directly.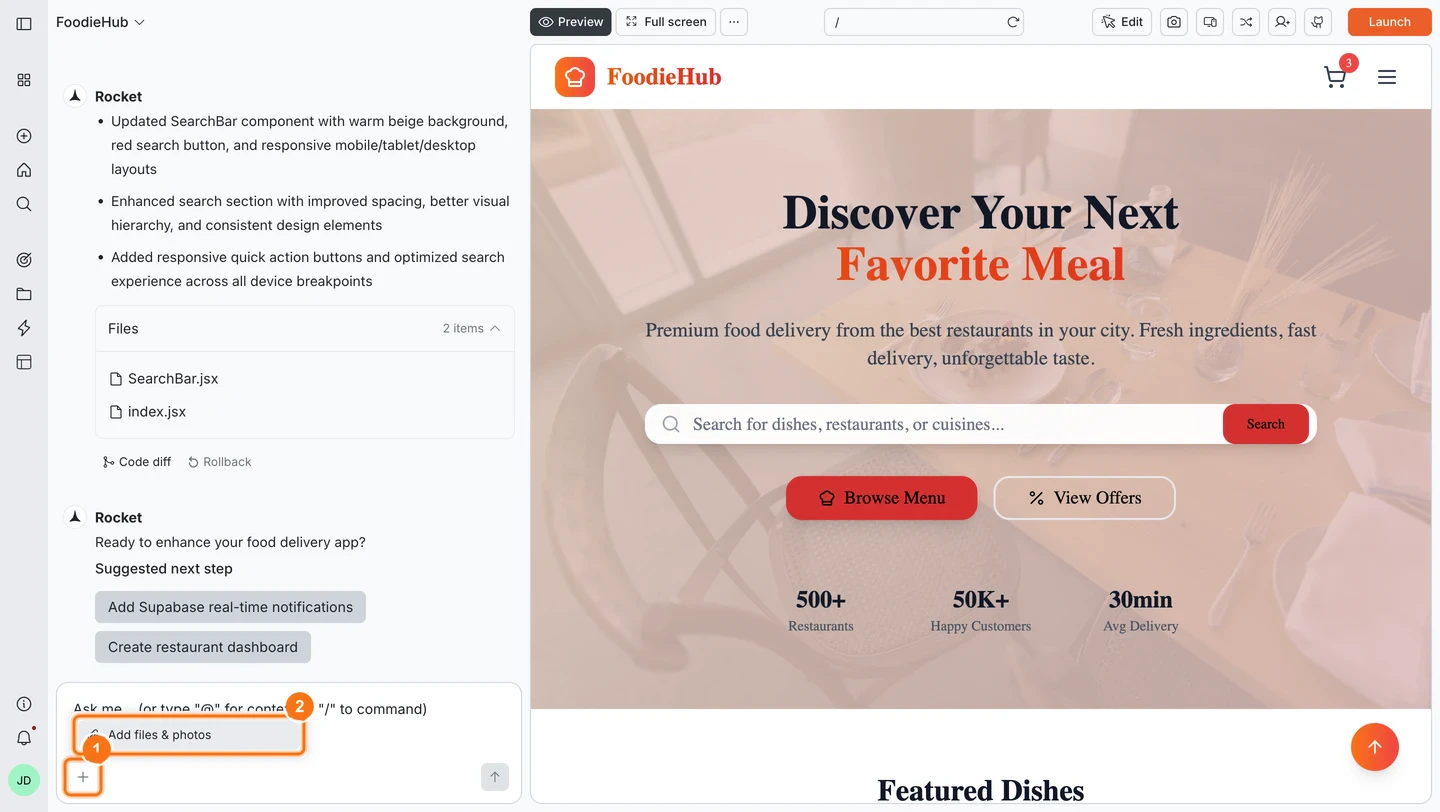

Select your file
Choose a file from your device. Supported file types: images (
.png, .jpg, .jpeg, .ico), PDFs, Excel (.xlsx), CSVs, and Markdown (.md).You can attach up to 5 files per message. Each file must be under 5 MB.
| Attachment | What to say |
|---|---|
| Design screenshot | ”Match this layout for the landing page” |
| Logo image | ”Replace the app logo with this file” |
| CSV data | ”Build a product catalog from this spreadsheet” |
| PDF spec | ”Build the onboarding flow described in this document” |
Continuing a conversation
Rocket remembers everything in the current task, so you can keep building without repeating context.Refine the last result
Refine the last result
Ask Rocket to adjust, expand, or rework its previous output without starting over.
- “Change the hero background to dark blue instead”
- “Add a section for customer testimonials below the pricing table”
- “Make the sidebar collapsible on mobile”
Change direction mid-task
Change direction mid-task
Change course at any point. Rocket adapts while keeping what came before.
- “Actually, use a single-column layout instead”
- “Scrap the modal approach - use an inline form instead”
Reference earlier outputs
Reference earlier outputs
Point back to something Rocket built earlier in the same task.
- “Apply the same color scheme you used on the dashboard to this page”
- “Use the button style from the hero section throughout the app”
Web vs mobile
- Web Browser
- Mobile App
The web browser provides the full experience:
- Slash and @ commands for targeted edits
- Visual edit mode for direct manipulation
- Image generation for AI-generated images and SVGs
- Preview for testing on different screen sizes
- Version history with code diff, rollback, labels, and per-version launch
- Code tab for browsing and editing files directly
- Smart suggestions for next steps
- Full project settings and integrations access

Tips
Be specific
Be specific
Vague messages produce vague results. Name the element, its location, and what you want it to do.
| Instead of | Try |
|---|---|
| ”Make it look better" | "Increase the hero section height to 80vh and add a gradient from #1e3a5f to #0f172a" |
| "Fix the nav" | "The mobile navigation menu is not closing when a link is tapped” |
One change per message
One change per message
Break complex requests into individual messages. Rocket is more accurate when the scope is focused.
Name sections and quote text
Name sections and quote text
Reference the exact section, component, or file. Quote any text you want changed.
- “In the hero section, change ‘Get started’ to ‘Launch now’”
- “In the pricing table, swap the order of Pro and Business columns”
Use commands for precise edits
Use commands for precise edits
Slash and @ commands are faster and use fewer credits than describing everything from scratch.
Attach visuals for layout work
Attach visuals for layout work
Screenshots and mockups help Rocket match exactly what you have in mind, especially for layout and design changes.
What’s next?
Commands
Use slash and @ commands for precise, targeted edits.
Visual edit
Click any element to change it directly without writing a prompt.
Generate images
Create AI-generated images and SVGs placed directly in your app.
Preview your app
Test your app on different screen sizes before deploying.
Versions
Compare, roll back, label, and launch specific versions.
Code tab
Browse and edit your project files directly in the code view.
Environment variables
Store API keys and secrets your app needs at runtime.
APIs
Import and attach APIs to your UI elements.