Execute precise edits with Rocket.new slash and @ commands inside the Build editor. Part of the only vibe solutioning platform with research, building, and intelligence.
Use this file to discover all available pages before exploring further.
Commands give you precise control over edits without writing long prompts. Type / to run screen-aware shortcuts on whatever page is open, or type @ to lock edits to a specific file, folder, or task. Both run from the chat input and are only available in the web browser editor.
Commands use fewer credits than open-ended prompts. Quoting exact text or naming the area you want to change avoids follow-up messages.
Slash commands automatically target whatever page or screen you have open. You do not need to specify a file.
1
Open the screen you want to edit
Navigate to the page or screen you want to change. 
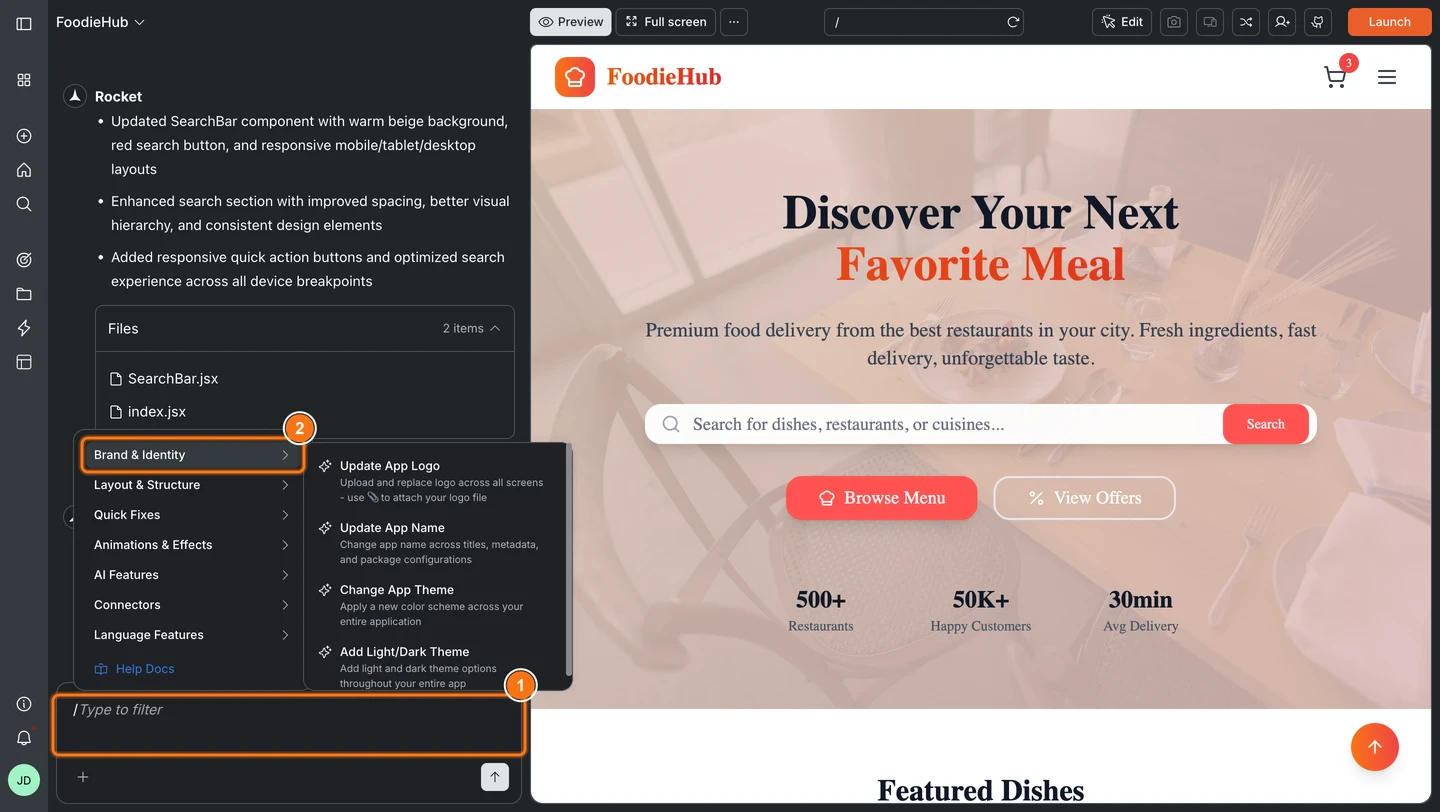
/ commands automatically target whatever is currently open.
2
Type `/` in the chat input
A popup menu appears with all available commands. Browse the list or start typing to filter.
3
Select a command and describe what you want
Pick a command from the menu, then write your instruction in natural language. Reference sections, elements, or quote exact text for the most accurate result.
Browse the full command catalog below. Commands are organized by platform (Web or Mobile) and category.
Web
Mobile
Brand & Identity
Layout & Structure
Quick Fixes
Animations & Effects
AI Features
Connectors
Language Features
SEO (Search Engine Optimization)
GEO (Generative Engine Optimization)
Accessibility
Privacy and compliance
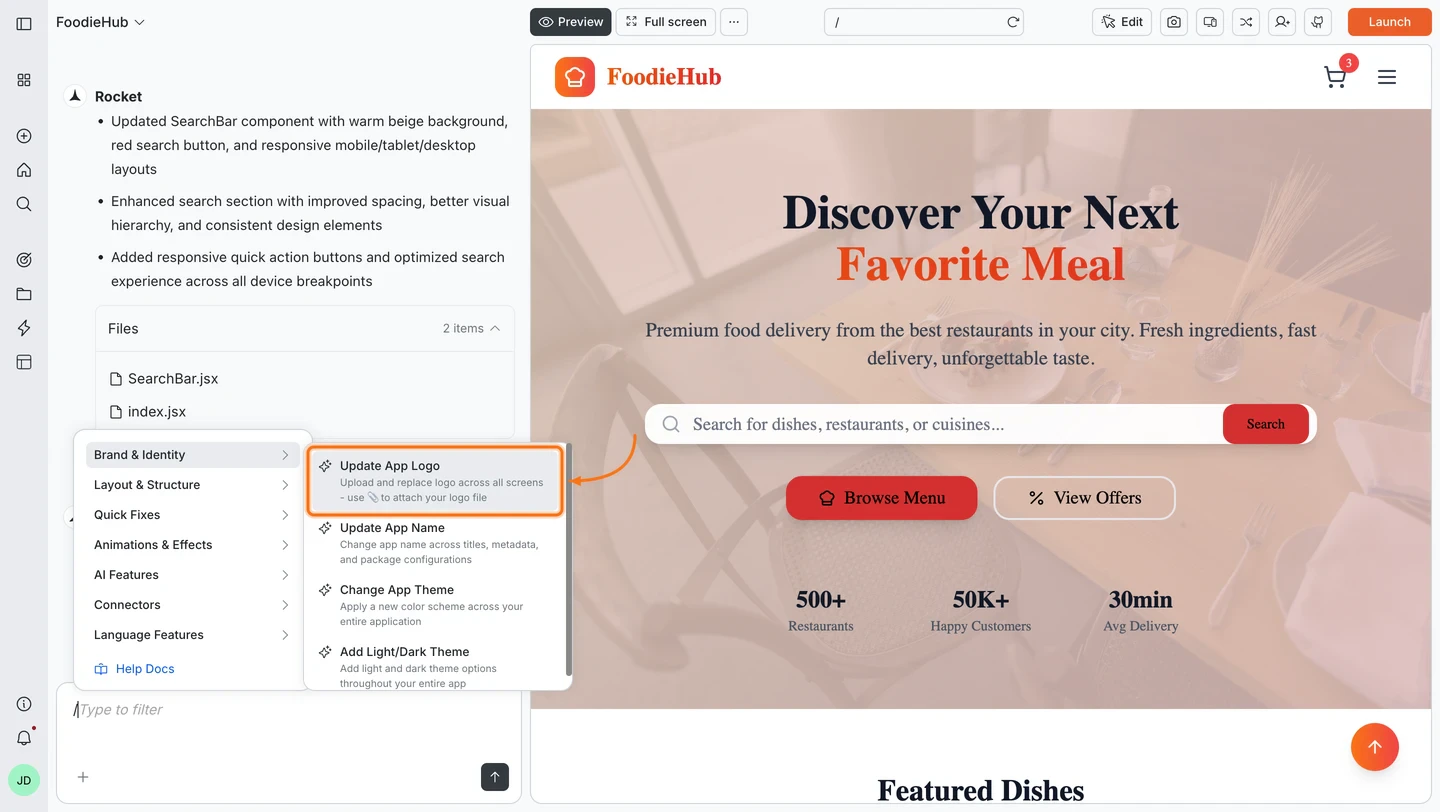
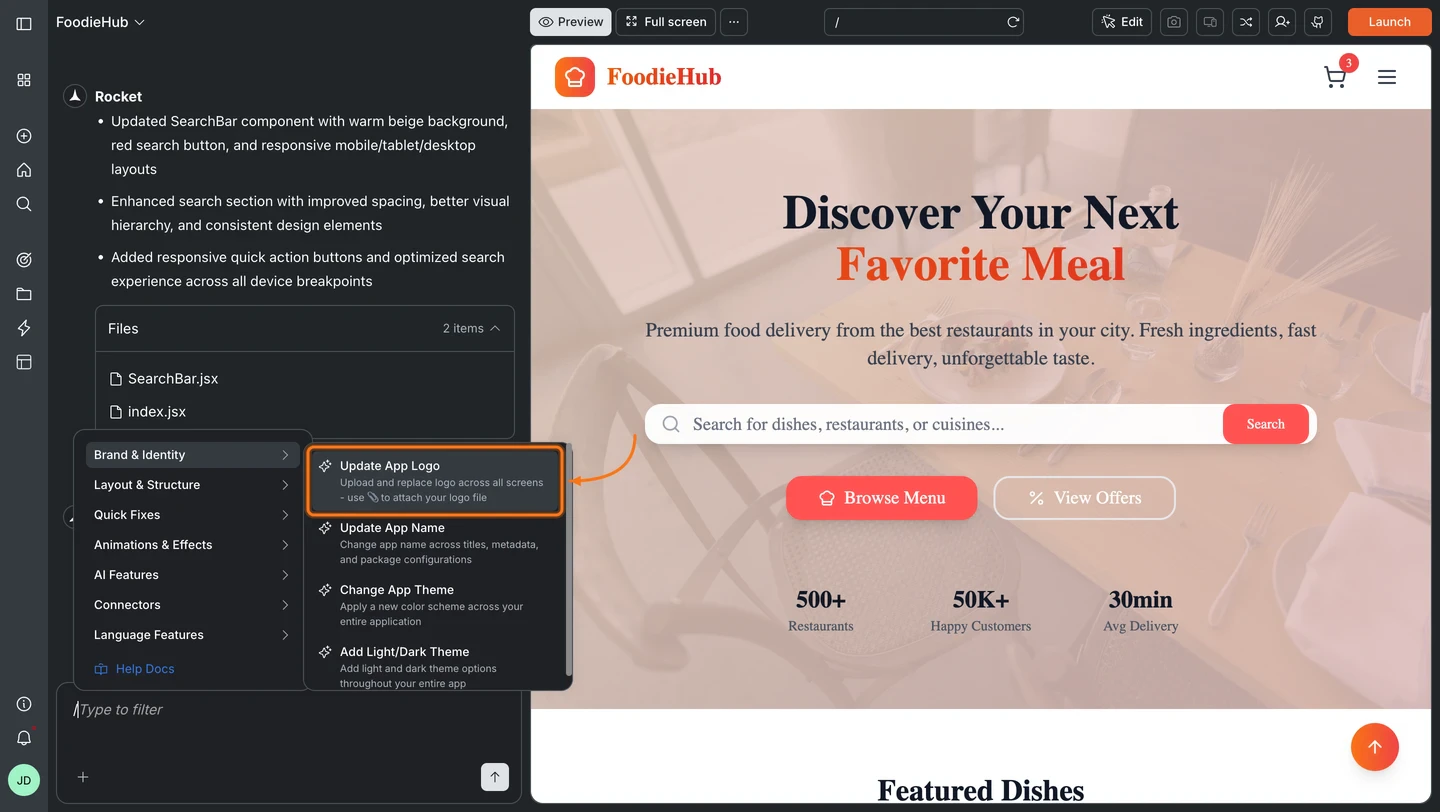
/Update App Logo
Purpose:
Replace the app logo across all pages.Usage:
Attach the logo file first, then run the /Update App Logo command.Examples:
/Update App Logo
/Update App Logo use the logo from the attached file
Transparent PNGs work well for logos.
/Update App Name
Purpose:
Change the app name in titles, UI, and metadata.Examples:
/Update App Name Nova Suite
/Update App Name Atlas
For custom text blocks that still show the old name, use /Update Content.
/Change App Theme
Purpose:
Apply a new color scheme across your entire web app.Examples:
/Change App Theme switch to a light theme with navy primary and soft gray background
/Change App Theme primary color #4F46E5 and accent #F97316
If colors look off after a big change, follow up with /Fix Theme Switching.
/Add Light/Dark Theme
Purpose:
Add coordinated light and dark theme options to your app.Examples:
/Add Light/Dark Theme
/Add Light/Dark Theme with higher contrast dark mode for text and buttons
Use /Fix Theme Switching if toggling between modes does not update all areas.
/Generate SVG Illustration
Purpose:
Create custom AI-generated SVG illustrations, hero visuals, section graphics, icons, and diagrams tailored to your app. SVGs are vector-based, so they scale to any size without losing quality.Examples:
/Generate SVG Illustration replace the hero image with a custom drawing of a rocket launching from servers
/Generate SVG Illustration add a process flow illustration showing fresh farms to cleaning to factory processing
/Generate SVG Illustration create an animated notification bell icon with a gentle swing animation, duotone style, for the subscribe section
Describe the style (isometric, geometric, line art, gradient), intended placement (hero, section, icon), and colors for best results.
/Update Content
Purpose:
Replace text, placeholders, or branding in the current page.Examples:
/Update Content change "Get started" to "Launch now" in hero section
/Update Content change hero title to "Welcome to Rocket" in hero section
/Update Content change all CTA (Call To Action) buttons to "Buy Now" in pricing section
/Update Content change pricing tier names to Starter, Growth, Scale in pricing section
/Change Element
Purpose:
Replace an existing UI element with a different element type on the current page.Examples:
/Change Element change hero image to video in hero section
/Change Element change secondary button to a text link in footer
/Add Element
Purpose:
Insert a new UI element into the current page.Examples:
/Add Element add testimonial card under "What our customers say" in reviews section
/Add Element add sticky CTA button in header that links to pricing section
/Remove Element
Purpose:
Delete UI elements or sections with automatic layout reflow.Examples:
/Remove Element hero section
/Remove Element footer
/Remove Element announcement bar
/Remove Element image row under "Features"
/Remove Screen
Purpose:
Delete an entire screen from your app, including its route and navigation references.Examples:
/Remove Screen delete the About page
/Remove Screen remove onboarding screen
/Restructure Screen Layout
Purpose:
Restructure the layout of the current page to a different design pattern.Examples:
/Restructure Screen Layout change pricing section to a three column grid
/Restructure Screen Layout turn hero into split layout with text on left and image on right
/Fix Layout Issues
Purpose:
Automatically fix spacing, alignment, positioning, and responsiveness issues on the current page.Examples:
/Fix Layout Issues
/Fix Layout Issues for mobile breakpoints
/Fix Layout Issues in pricing grid
/Fix Layout Issues for tablet and mobile breakpoints
/Fix Navigation Issues
Purpose:
Resolve navigation and routing problems in your web app.Examples:
/Fix Navigation Issues in header navigation
/Fix Navigation Issues in sidebar menu for dashboard routes
/Fix Navigation Issues for broken links in the footer
/Fix Theme Switching
Purpose:
Fix problems when switching between light and dark mode.Examples:
/Fix Theme Switching for navbar and footer
/Fix Theme Switching on dashboard pages where text stays dark on dark background
/Fix Hydration Errors
Purpose:
Automatically fetch active errors from the running preview, filter by React hydration mismatch patterns, and apply targeted fixes to each affected file.Examples:
/Fix Hydration Errors
/Fix Hydration Errors in the dashboard layout
/Fix Hydration Errors related to date formatting
Make sure the preview is running so Rocket can read the active error log. Works with Next.js, Remix, and any SSR React setup.
/Organize Code
Purpose:
Break large files into smaller modules and clean up structure for specified files.Examples:
/Organize Code in src/components/dashboard.tsx
/Organize Code for auth related files in src/auth
/Add Page Transitions
Purpose:
Add smooth animations between pages across your web app.Examples:
/Add Page Transitions slide in from right for all marketing pages
/Add Page Transitions fade between dashboard and settings pages
/Generate Image
Purpose:
Create an AI generated image and place it by naming the destination.Examples:
/Generate Image add hero banner with soft gradient sky to hero section
/Generate Image replace product visual in hero section with a sleek abstract render
/Generate Image replace image in pricing card A with a minimal 3D icon
/Generate Image replace team photo in About with an abstract 3D shape (include alt: "Our team values")
Use one clear visual idea per command. Include alt text where it improves accessibility.
/Suggest What to Build Next
Purpose:
Get AI recommendations for what to build next based on your current app.Examples:
/Suggest What to Build Next based on current dashboard and auth flows
/Suggest What to Build Next to improve onboarding and first session experience
/Migrate AI Integration
Purpose:
Migrate old AI integrations to a new secure server-side architecture.Examples:
/Migrate AI Integration
/Migrate AI Integration update all client-side AI calls to use server-side handlers
Supabase
Stripe
Resend
Twilio
AI Chatbot
Google Analytics
Adsense
Mixpanel
Airtable
Notion & Docs
Linear
CMS
Email
Scheduling
Forms
/Add Phone Authentication
Purpose:
Enable phone number login with OTP verification using Supabase Authentication.Examples:
/Add Phone Authentication add phone OTP login to the signup screen
/Add Phone Authentication enable phone number sign in alongside email login
/Add Supabase Authentication
Purpose:
Add a complete authentication system with login, signup, profile, and password reset screens.Examples:
/Add Supabase Authentication set up login, signup, and forgot password
/Add Supabase Authentication add auth screens to this app
Make sure your Supabase project is already connected in Rocket before running this command.
/Add Social Authentication
Purpose:
Add social sign in options using OAuth providers.Examples:
/Add Social Authentication with Google and GitHub
/Add Social Authentication add Google sign in button to login page
/Fix Supabase Authentication Issues
Purpose:
Automatically diagnose and fix common Supabase authentication problems.Examples:
/Fix Supabase Authentication Issues
/Fix Supabase Authentication Issues for users who can sign up but cannot log in
/Add Stripe Payments
Purpose:
Set up one time checkout payments with Stripe.Examples:
/Add Stripe Payments create checkout for Pro subscription on pricing page
/Add Stripe Payments add one time purchase flow for order page
/Add Email Alerts
Purpose:
Send automated email messages to users using Resend. Set up notifications for account updates, order confirmations, newsletters, or custom alerts.Examples:
/Add Email Alerts send welcome email when user logs in to the system
/Add Email Alerts send order confirmation emails after successful checkout
/Add WhatsApp Messages
Purpose:
Send automated WhatsApp messages to users using Twilio. Great for order updates, appointment reminders, and customer notifications.Examples:
/Add WhatsApp Messages notify users to update product offers
/Add WhatsApp Messages send appointment reminders from bookings page
/Add Text Messages (SMS)
Purpose:
Send automated text messages (SMS) to users’ phones using Twilio. Perfect for verification codes, order updates, and time-sensitive alerts.Examples:
/Add Text Messages (SMS) send order confirmation after checkout
/Add Text Messages (SMS) send OTP codes on signup
/Add AI Chatbot
Purpose:
Add an AI powered chat assistant to your web app. You can specify any LLM (Gemini, Anthropic, OpenAI, or others).Examples:
/Add AI Chatbot add support assistant widget on Help page using Anthropic
/Add AI Chatbot add in app assistant on dashboard
/Setup Google Analytics
Purpose:
Configure Google Analytics for page tracking, event tracking, and user properties.Examples:
/Setup Google Analytics use measurement ID G-XXXXXXX
/Setup Google Analytics track page views and signup button clicks on marketing pages
/Setup Adsense
Purpose:
Place Google Adsense ad units throughout your web app.Examples:
/Setup Adsense add banner ad in blog sidebar
/Setup Adsense add responsive ad unit at the end of article pages
/Add Analytics Tracking
Purpose:
Track events, screen views, user identity, and funnels with Mixpanel.Examples:
/Add Analytics Tracking identify users on login and track page views and button clicks
/Add Analytics Tracking track checkout funnel from cart to confirmation
/Add User Data to Airtable
Purpose:
Save form submissions or user records directly to Airtable.Examples:
/Add User Data to Airtable save contact form submissions to my base in the Leads table
/Add User Data to Airtable save new signups to Airtable Members table
/Apply Review Feedback
Purpose:
Read design or technical review comments from a Google Doc and apply them to the code.Examples:
/Apply Review Feedback apply the design and tech review comments from this document [paste URL]
/Generate Screens from Content
Purpose:
Turn structured content from a Notion page, Google Doc, or Google Sheet into fully generated app screens.Examples:
/Generate Screens from Content generate app screens from the FAQ entries and copy in this page [paste URL]
/Enforce Business Rules
Purpose:
Read rules from a document and convert them into tested, executable application logic.Examples:
/Enforce Business Rules convert the pricing and commission rules in this document into executable logic [paste URL]
/Sync Requirement Changes
Purpose:
Re-read an updated spec and apply the changes to the relevant parts of the app.Examples:
/Sync Requirement Changes re-read this page and apply any requirement changes to the codebase [paste URL]
/Implement User Stories
Purpose:
Read a list of user stories and generate corresponding feature code for each.Examples:
/Implement User Stories implement the stories listed in this document [paste URL]
/Build Feature from Spec
Purpose:
Read a PRD or feature spec from Notion, Google Docs, or Linear and generate the full feature with screens and logic.Examples:
/Build Feature from Spec build the feature described in this page [paste URL]
/Implement Ticket
Purpose:
Fetch a Linear ticket and generate code scoped strictly to the ticket requirements.Examples:
/Implement Ticket implement the requirements in ticket ENG-123
/Implement Ticket [paste ticket URL or ID]
/Add CMS Content
Purpose:
Connect screens to a Strapi or Directus CMS collection with list, detail, and search views.Examples:
/Add CMS Content show a paginated blog list and detail page from my articles collection
/Add CMS Content connect the products screen to my Strapi products collection
/Add Dynamic Config
Purpose:
Drive app content, feature flags, or settings from an external store like Airtable, Strapi, or Directus.Examples:
/Add Dynamic Config load feature flags and copy from a remote table at app startup
/Add Dynamic Config drive homepage banner content from an Airtable base
/Add Email Sign-up
Purpose:
Subscribe users to a mailing list on registration or opt-in using Mailchimp, Brevo, or Mailerlite.Examples:
/Add Email Sign-up add an opt-in checkbox on registration and subscribe users to my audience
/Add Email Sign-up add newsletter sign up form in footer
/Add Email Verification
Purpose:
Generate OTP or magic link verification email flow using Brevo or Sendgrid.Examples:
/Add Email Verification send a 6-digit OTP on signup
/Add Email Verification use a magic link to verify email
/Add Transactional Email Notifications
Purpose:
Set up instant emails like welcome messages, OTP codes, alerts, and order confirmations using Brevo or Sendgrid.Examples:
/Add Transactional Email Notifications welcome email on signup, OTP verification, order confirmation
Use @ commands to scope edits to a specific file, folder, or task. This is useful when you know exactly which part of the codebase you want to change.
1
Trigger the picker
Start your message with 
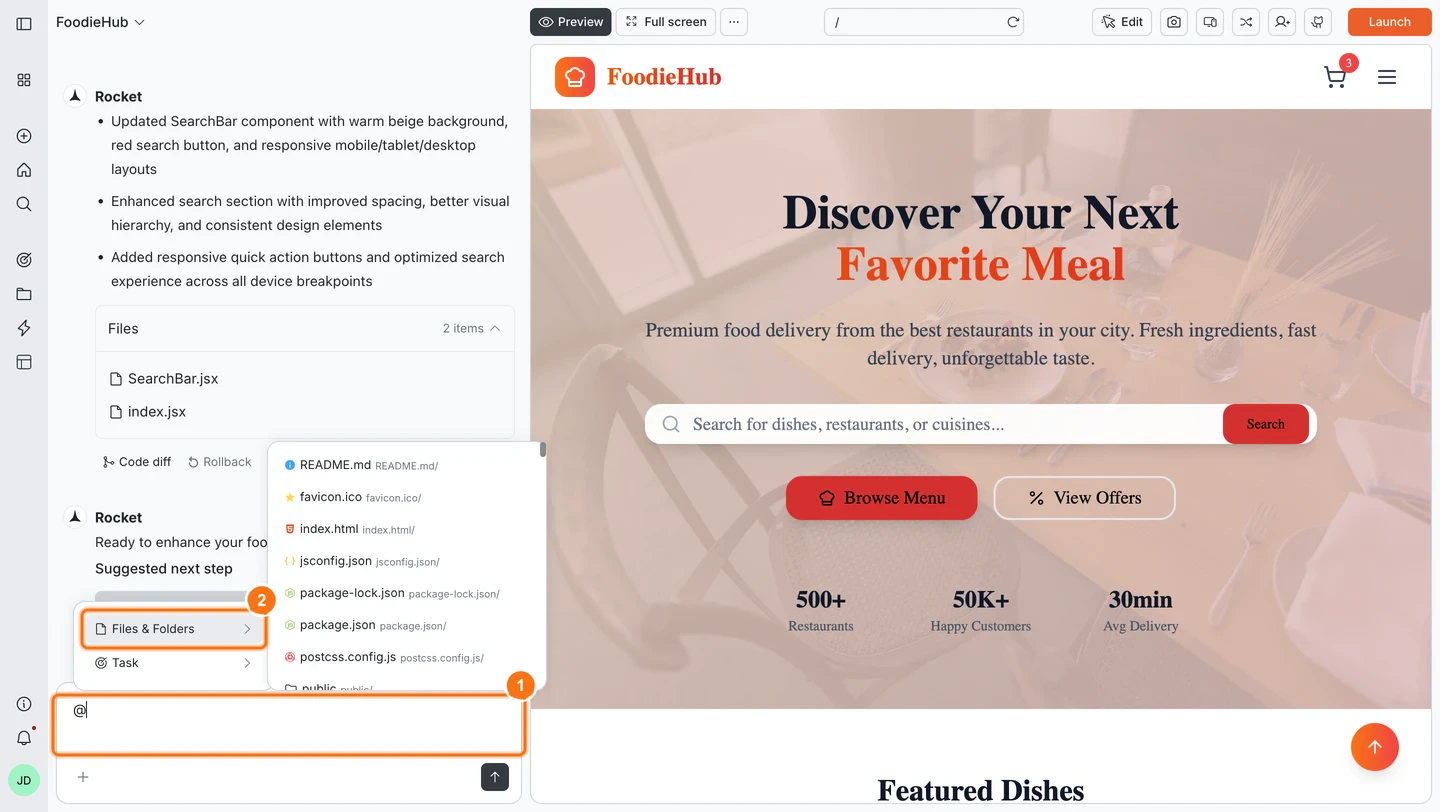
@, or insert it anywhere in your sentence. The picker opens in chat with Files & Folders and Tasks options.
2
Select your target
Choose Files & Folders to scope edits to a file or folder, or choose Tasks to bring in context from a previous task. Your selection appears in the chat input.
3
Write your instruction
Continue typing. The scope is locked to your selection, so Rocket only modifies the targeted file or folder.
Selecting Tasks from the @ picker links a previous task and brings its context into the current conversation. See cross-task context for details on how this works.
Restructure content:@pages/faq.jsx Reorder questions so payments and refunds appear first. Keep answers unchanged.Improve guidance:@pages/onboarding.jsx Rewrite tips to be friendlier and shorter. Keep the same steps.Replace visuals:@assets/screenshots Replace getting-started.png with the latest capture. Update the caption to match.Clarify microcopy:@components/empty-state Rewrite the message to set expectations and add a single call to action.Localize a section:@pages/about.jsx Translate the team bio section to Spanish. Keep names and roles in English.